#the100dayproject 2022

I completed #the100dayproject for the first time in 2021 where I decided to ‘print something everyday’ (you can read about it here). This year I have taken up the challenge again and I’ve chosen to print 100 4″x6″ photograms*.

*Photograms are created by placing objects directly onto photo-sensitive paper and exposing them to light. They use a camera-less photography technique and so don’t require a camera, film or an enlarger to create.

I was first inspired by Man Ray’s Rayographs and Mohly Nagy’s photograms while studying photography at Uni. I loved developing b&w photographs and would happily spend many hours in a darkroom.

My recent exploration into cyanotypes (also influenced by Man Ray and Moholy Nagy along with Karl Blossfeldt and Anna Atkins) has enabled me to develop similar photograms using UV light and water.

To make the process easier I made a mini darkroom in my house by converting a small utility room (that has no windows). I added a red safe light and a hanging line and I was able to develop my cyanotypes there.

Test prints drying in the darkroom

To take this a step further, for the 100 day project, I have bought photographic paper and black and white darkroom chemicals.

Darkroom chemicals – developer, stop bath and fixer

I’ve started my 100 day project with a botanical theme. Last year I divided the 100 days up into 10 x 10-day series, which worked really well for me, so I will do this again this year. I’ve also realised that darkroom developer doesn’t last very long once it has been mixed (2 days max), so I plan to make 10 prints in one darkroom session. Below is a selection of prints I made in the first session…

Days 1-10 various botanicals

My challenge started on Sunday 20 February and will end on Monday 30 May. You can follow my daily postings on Instagram #100daysof4x6photograms).

Handmade paper

I’d been given a set of old encyclopedia volumes to use for collage, as altered books or even to recycle as handmade paper. I decided I’d give handmade paper-making a go.

Encyclopedia volumes

I was intrigued as I’d been told that due to the age of the books, and the way they had been printed, that the letters were likely to stay intact rather than blend into a mushy grey (which digitally printed papers are more likely to do).

Internal page

So I started by tearing a few pages out of the books and ripped these into smaller pieces of paper. I left them to soak in a bowl of water for an hour or so before using an old kitchen stick blender (no longer used for food!) and blended the paper into a pulp.

Paper shredded, ready for blending

I experimented with a few different types of mesh for creating the sheets of paper. Then after watching a few online videos I found that car bodywork repair mesh worked brilliantly!

So I dipped the mesh into the watery/pulp and pulled it out, this gave me a layer of pulp on the mesh (the amount of water in the pulp affects how thick the paper will be: less water = thicker paper). I then needed to press out as much liquid as I could. Once I’d done this I flipped the mesh over and released the sheet of pulp onto a Jay cloth. I added a second Jay cloth on top to create a ‘sandwich’ and then repeated the process.

Sheets of handmade paper

The process was really successful (once I got the hang of it), and I was able to make quite thin sheets of paper. It was easy to build up a ‘sandwich’ of 10-20 sheets (this will depend on how much pulp you’ve made). I also like rough edges, so I didn’t worry about giving the paper straight edges, but this could be done by placing a frame onto the mesh before pulling out the pulp.

Letters are still visible

I really liked how the letters were visible on the paper. The level of detail in the lettering is affected by how long the paper is blended for. The less time spent blending = more definition in the lettering.

The next step now is to try blending different types of paper (basically I’ll be rummaging through my recycling paper bin for junk mail and packaging), this will hopefully add more colour and images to the paper. Plus I’d like to add seeds and petals and…the list goes on!

My first art studio

Studio

Do I don’t I..?

I’ve been mulling over the idea of getting an art studio for a while. But there were always some niggling questions that would keep appearing in my head: ‘Would I use it?’; ‘Do I even need one?’; ‘Would I find something suitable and local?’… and so on.

As I already work from home I’m used to being there and had created a small space (in the corner of a room) where I could set up my art materials and work from without too much distraction. The pros being: it was local, tick; free, tick; and VERY convenient, tick. The cons being: I was still at home; the space needed to stay clean; it wasn’t very big; and distractions did occur.

Home studio space

So, I started to look around the local area, just to see what was out there. But I didn’t have much luck…some spaces were too big; some were too far away; and some were way too expensive for what I wanted. A bit of a Goldilocks story really. And then I heard about availability at some local art studios that were smallish, affordable and only a 15 minute drive away.

Hadleigh Old Firestation – HOFs

Moving in day at the studio

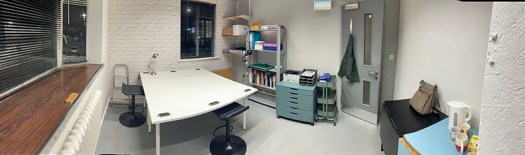
Hadleigh Old Firestation (HOFs) provides studio space for local artists. When I went for a viewing there were two studios available, so it was good to have a choice and a comparison. Both would have been suitable but this one felt right 🙂 With dual-aspect windows it has a view out onto the street and to the local supermarket (always handy). It has plenty of space for me to work and plenty of storage. The art studios, run by the arts organisation ACAVA, have a number of artists working there, so it’s good to have like-minded people around.

Moving in

Once the paperwork had been signed and monies paid, I picked up the keys in September. I was excited to move in and to start making the studio feel like a creative space. I already had furniture at home that I wanted to take (tables, stools, shelves plus books, art materials etc…) I just wanted some essentials like a mini fridge, a plan chest and a wheelie trolley for my art materials.

Window view and tea!

Have I made the right decision?

Well it’s early days yet but so far, I would say a resounding YES! This is how I’ve responded to my initial concerns:

  • Would I use it? I wasn’t sure if I would want to leave the comfort of home to go to a studio, but now I know it’s there I just want to be in it. I’m not there as often as I would like to be, so some changes need to be made.
  • Do I need it? Now I have a dedicated art space, I want to make it pay for itself, which is inspiring me to start work on a new business idea…
  • Would I find something suitable? If you know what you are looking for, it’s so much easier to recognise it when it comes along. I had decided that for my first studio I wanted somewhere low risk and easy to travel to. Moving to HOFs also has the benefit of being part of a ready-made artist community. Win-win 🙂
Working in my studio
Sketchbook work

Leigh Art Trail – finally!

The Leigh Art Trail has been a long time coming, or so it felt. Originally due to be held in May 2020 it was yet another event in an endless list that was postponed due to the pandemic.

I had begun preparing for the Trail, along with the other artists in SEVEN, back in September 2019. We were excited to be exhibiting at a new venue – The Refill Room, which is the first zero-waste shop in Leigh-on-sea. In response to the values of the shop we chose the theme of ‘Reclamation’. Our starting point was to find old, unloved second-hand books that we could turn into altered books.

SEVEN’s venue number

Crewel embroidery

The book I chose was on crewel embroidery. The pages in the book were a mix of photos, text and embroidery stitch diagrams, which gave me plenty of material to work with. The idea of an altered book is that you can respond to the content already there (if you want to) or cover it up (if you don’t) and remove any surplus pages – the choice is yours. In my book I seemed to find a heading on each page that I wanted to respond to, and tried to work with the imagery already on the pages. Plus as the subject was embroidery, so I decided to stitch directly into the pages.

Close up detail of stitching
Working on my sketchbook in the garden

Fast forward to September 2021

The event date suddenly arrived! Having waited so long for it, it seemed to come around in a flash!

SEVEN’s venue number

The event ran over two weeks and three weekends, instead of the usual one week; we were in a different month; and in a new venue, so all in all the September Trail felt a bit odd.

We usually stay in the venue for the duration of the Trail, but two weeks felt a bit too long to do this (plus life got in the way), so we only spent the weekends at the venue. While the number of visitors seemed to be less than usual (perhaps some were still unsure about going out, plus there were so many other events on in September), the visitors we did have were very engaged in our work and an absolute joy to chat with!

The Refill Room – view from outside
LAT sketchbook – crewel embroidery

In addition to our sketchbooks, this year we also decided to create a window display of ‘flags’. The shop already had a branch hanging in the window and we were kindly allowed to use this. We decided to hang a lightweight material that was sustainable; allowed the light to come through; and also revealed the image on the back of the fabric, so it could be seen from both inside and outside the shop. We chose a bamboo fabric, scanned a page from our books, and had the image digitally printed by Textile Town.

Bamboo fabric flags, digitally printed

We’re now starting to plan ideas for LAT 2022, which will be the 25th anniversary of the Art Trail. Bring it on!

The Water Replies – Estuary Festival 2021

Back in March 2020 I signed up to ‘The Water Replies’ journal project, led by Metal Southend and Cement Fields, as part of the second Estuary Festival. The festival takes place along 107 miles of the South Essex and Kent coastline with artists, events and workshops responding to contemporary issues surrounding the estuary.

The project began just before the pandemic hit and the UK was put into lockdown. During lockdown, when everyone was confined to their homes, we were allowed to go outside once a day for solitary exercise. For me this meant a long walk along the seafront. I’m so thankfully to have the estuary and beach a few minutes walk away from my home.

As contact with the outside world was reduced, I found that during my daily walks or runs along the estuary, I became more focused and mindful on what I saw and what captured my attention. The tidal times change daily. The mud flats appear and disappear. Sunlight glistens on the water. Big skies. Bold silhouettes of the pier and groynes…etc

For my journal I wanted to record my impressions of the coastline beginning at Southend Pier and travelling along the coast towards the QE2 bridge. I chose landmarks and areas of interest along the way: the pier, Gypsy bridge, incoming tide patterns, barnacles, silhouettes, sea birds, beach textures, seaweed, shells, Two Tree Island, views across to Kent, Coryton oil refinery, QE2 bridge…

This is a selection of pages from my journal:

Journal cover – The Water Replies
Silhouette of the groynes
Abstract map of the estuary
Gypsy bridge
Beach textures
Vintage postcard of Southend-on-sea

You can view a short turn-the-page video of all the journals entered into the exhibition at: www.estuaryfestival.com/water-replies-films.html

If you are in the area, find out more about the Estuary Festival, which runs from 22 May – 13 June 2021. Enjoy!