Mandala mosaic garden table

When I went to a local junk shop to buy a mid-century sideboard, I spotted another glass-top garden table. I do love these. I don’t think they are much to look at in their original state but they are perfect for adding a touch of mosaic decoration!

As the table was circular, I wanted to create a mandala-style design.

I began by placing tiles around the edge of the table to create a border, varying the colours with each row. I then located the centre of the table, divided the circle into eight segments and began to fill out the pattern; playing with different shapes, sizes and colours to develop contrast and balance in the pattern.

I always like to use broken mirror in my work; I love the way light reflects on the broken pieces. The effect is magnified when the table is in the garden as it mirrors its surroundings and twinkles in the sunlight.

Once I’d finished cutting the mirror pieces and positioning all the mosaic tiles, I used a tile adhesive to stick each piece down.

The next step was to grout the tiles. I prefer to use a dark grey grout, rather than white, to give a dramatic contrast against the colourful tiles.

I used a powder grout that when mixed with water becomes water and frost resistant. I mixed it to a slightly fluid solution and used a palette knife, making sure the grout filled all of the gaps.

Once the grout had begun to set I used a damp cloth to wipe over the tiles to clean off the excess. The grout was left to dry overnight and then I polished the tiles using a clean cloth and scraped off any excess grout from the edges of the tiles.

This is the finished table…


Mid-century sideboard

In our design studio we’ve been looking to replace a rather large storage unit with something smaller. The room doubles up as a work space and a guest bedroom but space is of a premium. The old piece of furniture we wanted to replace, although useful, did take up too much space and was a good excuse to hoard ‘stuff’ that didn’t really need to be there. So we wanted to find something smaller, that was cheap and we could ‘do up’.

In the local area, there are a large number of secondhand, house-clearance shops that I regularly browse around. We visited one of these shops that has a huge amount of furniture stacked floor to ceiling. And it’s here where we found our mid-century sideboard.

original-sideboard1

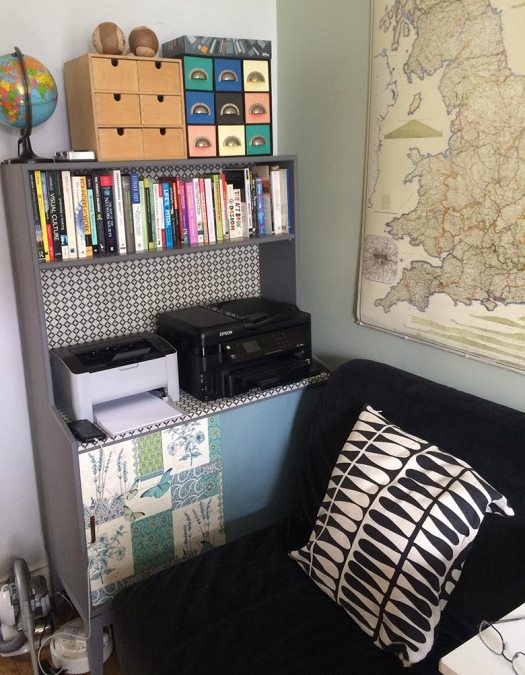
The top section had two shelves (which I took off to paint). The bottom sliding cupboard had shelves on the left and three drawers on the right.

original-sideboard2

I began by mixing a chalk paint solution using plaster of paris and grey emulsion. I lightly sanded down the furniture and applied the paint to the back and sides.

Once that had dried I pasted wallpaper on to the top section and front cupboard door. The back cupboard door and drawer fronts were also painted in a chalk paint solution using colours to compliment the wallpaper.

As we’ll put the printers on the bottom shelf we drilled a large hole in the back to feed the cables through.

This is the finished piece…

final-cupboard1

…and the drawers…

final-cupboard2

…and in situ…

final-cupboard3

We love it!

Re-upholstered 1950s kitchen stools

original-kitchen-stools

I recently bought a couple of 1950s stools from a local junk shop. I love this style of furniture as its simple, robust and very functional. The stools were structurally very solid, but obviously the upholstery was in need of some updating! These are the simple steps I took to reupholster them.

seat-removed

The first step was to remove the drop-in seat. To do this there were four simple wooden pegs that spin around to lock/unlock the top from the base. Once lifted off the next step was to remove the old fabric.

remove-old-cover

On newer pieces of furniture fabric is usually stapled in place. I used a staple remover and pliers to carefully remove all of them. With some reupholstery projects it is often a good idea to keep the old fabric to use as a template for cutting the new fabric; but as the shape of these seats were very simple it wasn’t necessary.

cut-foam-to-size

The next step was to cut a new piece of foam. The 1950s stool generally has a thin foam seat. However, this isn’t always as comfortable, especially if you’re planning on using it for more than occasional use. The foam I used was 1.5″ thick and was pre-cut to a square shape. I then drew around the seat with a black marker pen and cut around the corners with scissors. As an alternative to scissors you could always use an electric bread knife, which is more useful for thicker foam.

heavy-duty-glue

I used a strong adhesive spray to fix the foam to the seat, which I did outside in the garden. As the spray is very sticky I put down a plastic sheet under the seat before spraying.

cut-fabric-to-size

The next step was to cut a new piece of fabric. I positioned the seat on top of the fabric and cut around it leaving a border of approximately 2″.

attach-fabric

The next step was to attach the fabric. I always work on the edge furthest away from me as I can use my body to push against to create a consistent tension when pulling and stapling the fabric.

I put my first staple in the edge directly opposite me (i.e. the ‘north’ position), folding the fabric over and placing one staple in the middle about 1/2″ from the edge. I turned the seat 180 degrees (so that ‘south’ was at the top) and pulled the fabric tight and placed one staple in the middle. I then repeated this process for the ‘east’ and ‘west’ of the seat, giving me four staples to anchor the fabric in place.

Beginning from one of the middle staples, I then pulled and smoothed the fabric while stapling along the edge working towards each corner, leaving about 1″ away from the corner. I repeated this step until I had stapled along all four edges.

trim-excess-fabric

I then stapled the corners and trimmed off any excess fabric to prevent the corners from being too bulky and finally trimmed off any excess fabric from along the edges.

completed-stools

I put the drop-in seat back on the base and fixed it in place. These are my finished stools.

workspace

The stool is a perfect fit for my little creative work space.

Mosaic garden table

garden-table

I bought this table from our local antiques centre, Battlesbridge, as it was a perfect candidate for my next mosaic project.

mosaic-flowers

I bought a few sheets of mosaic tiles from B&Q and I started to play with the shapes and colours to get some ideas of what pattern I could make. I quite liked these Mackintosh-style flowers.

mosaic-table-development1

The table doesn’t have a central hole, so the first step was to measure out exactly where this was. I then began placing a red border around the outside of the table and added the four flowers, then I created the circle in the centre and added the leaves.

mosaic-workspace

I was working in my new crafty shed, which made the job so much easier and it was nice to shut the door on the mess.

mosaic-table-detail

Once I had mapped out the outlines of the pattern I began to fill in the gaps with smaller pieces using a mixture of glass tiles and broken mirror. The pieces were then glued down and left overnight to set.

mosaic-table-detail2

The final step was to grout the table. I always prefer the look of slate grey grout and I used one that is frost and water resistant.

mosaic-table

This is the finished table, which is now sitting pretty in my garden.


Writing bureau restoration

bureau-before2

I was given this writing bureau to restore, as it had a few scratches and was looking a bit sorry for itself. At first I simply cleaned and polished it to remove the scratches and lined the drawers. It was a perfect addition to the lounge, giving me a writing desk and storage for my wool.

So, having lived with it for a while now I wondered what it would look like painted. I had been reading an Annie Sloane book on painting furniture and also reading about decoupage on furniture, and I thought I would try to mix the two.

Rather than purchase chalk paint I used one of the home made chalk paint recipes that I’ve used previously on my catalogue drawers to paint the outside. I then used wallpaper to cover the drawers (luckily the height of the three drawers was exactly the width of a roll of wallpaper!). I cut the wallpaper into three pieces and glued them into position. To seal the drawers and to protect them from general wear and tear I coated them with two layers of Mod Podge.

bureau-after2

I replaced the drawer handles with these antique-looking ones. I was still able to use the existing holes from the original handles.

bureau-open-after

I painted the inside with an off-white egg shell paint, recovered the leather using a black leatherette and added the wallpaper to the back of the desk.